Paper plates are inexpensive to purchase and easy to store – thus making them a stress-free alternative for short notification crafting in the house or classroom or for group crafts. Paper plates simply scream to be transmuted into turtles. This paper plate turtle is going to be interesting while crafting it.
One can either beautify the shell with the help of markers or employ torn paper, relying on the age of children making this an easy-going activity. Preschoolers shall love making it with shredded paper while elder kids shall be adorning the details on their own.
This paper plate turtle can be easily adapted to make with tots as well; the paper plates can be decked with a dot marker or by painting them using their fingers – a cute art and craft with paper plates isn’t it?
You shall necessitate some simple supplies for this spectacular Turtle with Paper Plates, all the children who have tried it actually liked having a go at this plus you shall note that it looks wonderful while on display.
How to Make a Turtle Paper Plate?
STEP 1: The creation Turtle Paper Plate is fun for little children, particularly for parties! Here are more than a few of the things that you shall need to make a beautiful looking Turtle Paper Plate:
- Two paper plates – (BUY NOW)
- Brown construction paper – (BUY NOW)
- Green craft paint – (BUY NOW)
- Google eyes – (BUY NOW)
- Scissors
- Glue
- Dried beans (optional) – (BUY NOW)
- Felt tip pen – (BUY NOW)
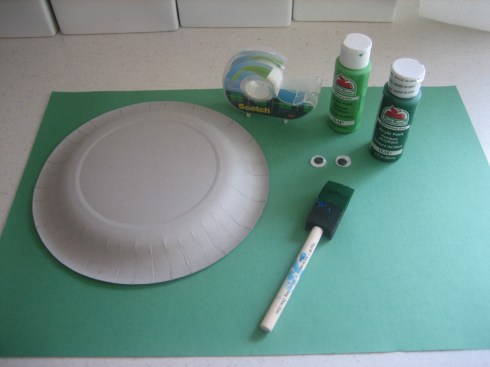 Image source – happyhomefairy.com
Your kid shall necessitate two paper plates in order to make a single turtle. Have your youngster employ the green paint to paint at the bottom edge of both paper plates. Permit it to dry.
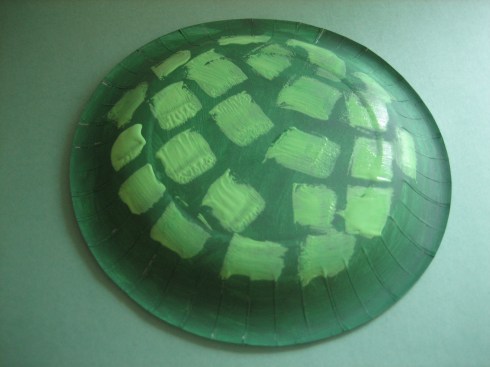 Image source – happyhomefairy.com
STEP 2: After that cut out the legs, arms, etc. Utilizing the scissors plus the brown creation paper, cut out four tiny rectangles for the legs, a small triangle for your tail, and a sphere for the head. One can sketch them initially with a pen if you desire, but it is not essential. You can cut them out freehand. You can find out how to make an owl with paper plate.
STEP 3: Glue the tips of the legs, arms, head, and tail to the top verge of one of your paper plates.
STEP 4: If you desire you can position some dried beans on the plate thus that while you glue these plates together, the turtle shall rattle when your children shake it. Though this step is non-compulsory.
STEP 5: Afterward, glue your second plate to the initial plate. The tops of these plates ought to be joined together so that the painted flanks are facing out. The legs, arms, head, and tail must be sticking out in the middle of your two plates.
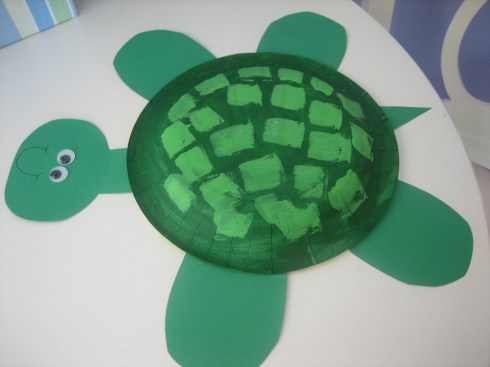 Image source – happyhomefairy.com
STEP 6: Aid your youngster to stick the Google eyes on to the turtle head. Let your kid employ the felt tip pen to draw on a mouth and a nose to beautify the “shell” of this turtle if they desire.
Let’s Wrap Up!
If you are searching for simple kids crafts to carry out with objects that you have nearby in your home or school, this step by step procedure is the best beginning point.
Young kids shall have an enjoyable time making a stress-free and enjoyable craft of a turtle assembled using shapes (triangles, circle, and ovals). Numerous basic skills may be addressed throughout and after the craft assembly procedure.
Paper plates are consequently simple to get hold of, so cheap and astonishingly versatile. During summer, while you tour various places, you will likely come across countless tiny creatures – such as the turtles! Turtles are amongst the gorgeous marine animals, do not mind how fast or sluggish they move!
There is something appealing regarding the peace-loving, slow-moving, own-business-minding turtle. Once you arrive home, re-experience the enthusiasm of noticing a turtle with these beautiful turtle crafts plus activities for children.